Custom Template ko apne blog par install karne par apko usme kafi sari cheezey theek karni padti hai, jaise ki Nav bar, Side Bars etc. Par jise Coding nahi ati uske liye ye kisi challenge se kam nahi hai. Toh usi ko dhyaan me rakh kar me Puri "Blog Customization Guide" likhne jaa rha hu. Jisse aap Favicon se lekar Naviation Bar, Sidebars sab kuchh achhe se customize kar sakte hain.
Related Post: Favicon Kya hai or kaise Custom Favicon Design kare?
Step 2: Ab HTML Editor me apko NavBar ke codes ko dhundna padege, par apko pta hona chahiye ki apko konse codes dhundne hai. Niche Screenshot me dekhe, hume yaha "All Posts" ki link ko change karna hai toh iske code ko search karne ke liye aap "All Posts" ko copy kar le.
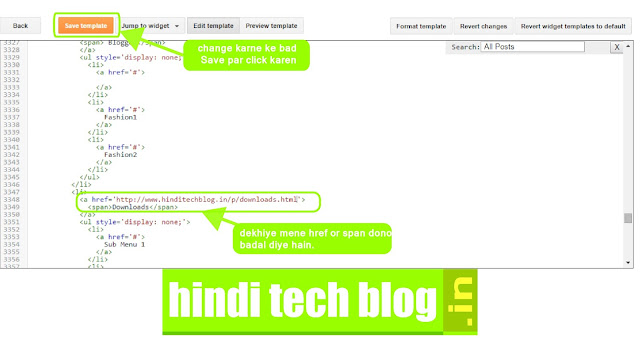
Jaise mene pahle ek download Page banaya or fir uski link ko href="" attribute me dala. Niche dekhe...
Related Post: Favicon Kya hai or kaise Custom Favicon Design kare?
Yeh Blogpost meri usi series ka hissa hai. Aaj hum sikhenge ke kaise aap apni Custom blog ke Navigation bar ya Menu Bar ko design kar sakte hain.
Toh sabse Pahle Hum jaan lete hain...
Toh sabse Pahle Hum jaan lete hain...
What is a Navigation Bar?
Jyadatar Websites par aapne dekha hoga sabse upar ki taraf ek "Bar" hoti hai jisme kuchh links di gyi hoti hai jaise ki HOME, ABOUT, CONTACT, etc. Isi Bar ko hum Navigation Bar bolte hai. Yeh Bar aapke viewers ko apki blog par unki jarurat ke hisaab se kuchh bhi Content asaani se search karne ki sahuliyat deti hai.
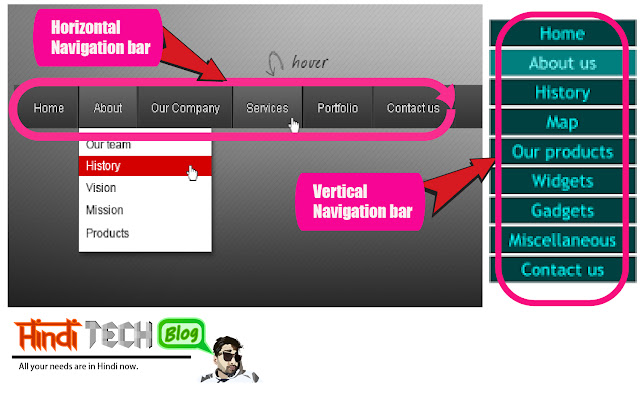
Aisa koi jaruri nahi hai ki Nav Bar blog ke Top par hi ho ise aap Left ya Right side bhi rakh sakte hain or chahe toh aap Top, Bottom ya Right ya Left me apni jarurat ke hisaab se kahi bhi rakh sakte hain. Aap niche screenshot me Horizontal or Vertical NavBars dekh sakte hai.
 |
| screenshot of Navigation Bars |
Ab aap samajh gye honge ki Navigation Bar ya Menu Bar kya hota hai. Toh aaiye ab hum ise kaise Customize kar sakte hain, jaan lete hain...
How to Customize Navigation Bar?
In kuchh simple se steps ko follow karke asaani se apne Custom Template ke Menu Bar ko customize kar sakte hain Par apni blog ke template me kuchh bhi changes karne se pahle Template ka backup jarur bana le....
Step 1: Sabse Pahle Blogger Dashboard>>Template>>Edit HTML ke vikalp par click kare. Isse apke samne "HTML Editor" khul kar aa jayega. Screenshots me dekhey.
 |
| Screenshot of blogger dashboard |
 |
| Screenshot of HTML Editor of blogspot |
 |
| Screenshot of hinditechblog website |
 |
| Customizing menu bar of blogger |
Step 4: Ab mene yahan All Posts ko Download me badal diya hai or dhyaan rakhe ki aapko href="your code here" attribute me bhi change karna padega. "href" attribute me aap wo link dale jiska aap Tab bana rahe hain.
Jaise agar aap About ka page Navbar me dikhana chahte hai to sabse pahle to apke paas about ka page hona chahiye or fir aap uski link ko href=" add link here" attribute ke andar dale.
Jaise mene pahle ek download Page banaya or fir uski link ko href="" attribute me dala. Niche dekhe...
Related Post: How to make pages in blogger?
Change karne se pahle...
<a href='http://www.hinditechblog.in/p/all-posts.html'>
lt;span>All Posts</span>
</a>
Change karne ke baad...
<a href='http://www.hinditechblog.in/p/downloads.html'>
<span>Downloads</span>
</a>
 |
| save template screenshot |
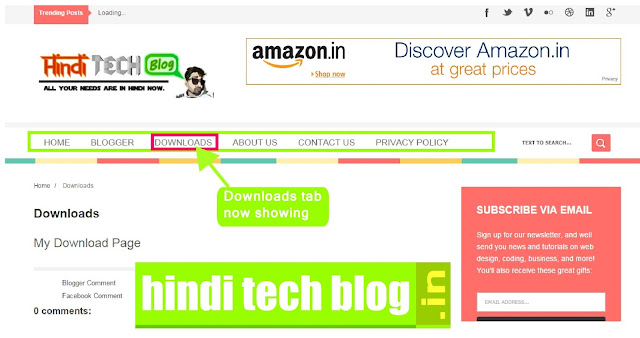
Step 5: Ab sare changes karne ke baad aap template ko save kar de. Template ko save karne ke baad apni blog ko check kare. Ab usmeDownload ka "Tab" dikhai de raha hoga. Screenshot me dekhey.

Hindi Tech blog website
Step 6: Aap aise hi changes karke apne Navigation Bar ko apne hisaab se Customize Kar sakte hain. Bas apko codes ko khojna padega.
....Starts Here...
<nav id='nav'>
<div class='conty'>
<ul class='nav menubar2' id='menu-main'>
<li>
<a class='active' href='/'>
<span>Home</span>
</a>
</li>
<li>
<a href='http://www.hinditechblog.in/search/label/Blogger'>
<span> Blogger</span>
</a>
<ul style='display: none;'>
<li>
<a href='#'>
</a>
</li>
<li>
<a href='#'>
Fashion1
</a>
</li>
<li>
<a href='#'>
Fashion2
</a>
</li>
</ul>
</li>
<li>
<a href='http://www.hinditechblog.in/p/all-posts.html'>
<span>All Posts</span>
</a>
<ul style='display: none;'>
<li>
<a href='#'>
Sub Menu 1
</a>
</li>
<li>
<a href='#'>
Sub Menu 2
</a>
</li>
<li>
<a href='#'>
Sub Menu 3
</a>
</li>
</ul>
</li>
<li>
<a href='#http://www.hinditechblog.in/p/about.html'>
<span> About Us</span>
</a>
</li>
<li>
<a href='http://www.hinditechblog.in/p/contact.html'>
<span> Contact Us</span>
</a>
</li>
<li>
<a href='http://www.hinditechblog.in/p/privacy-policy.html'>
<span> Privacy Policy</span>
</a>
</li>
</ul>
<div id='searchformfix'>
<form action='/search' id='searchform'>
<input name='q' onblur='if (this.value == "") {this.value = "Text to Search...";}' onfocus='if (this.value == "Text to Search...") {this.value = "";}' type='text' value='Text to Search...'/>
<input type='submit' value=''/>
</form>
</div>
</div>
</nav>
....end of code...
Jab bhi aap koi Navigation Bar customize karna chahe bas apko upar likhe jaise codes ko khojna padega or Red color me highlited dono jagah par changes karna padega. Jaise mujhe upar Download ka page dikhana tha toh mene download type karke download ka link "href" me dala.
I hope, me apko achhe se samjhaa paya par agar ab bhi apke man me koi doubts hai toh ap mujhse puchh contact kar puchh sakte hain.
Apko yeh post kaisi lagi yeh bhi jarur btaiyega.
Email: thepradeeptyagi@gmail.com
I hope, me apko achhe se samjhaa paya par agar ab bhi apke man me koi doubts hai toh ap mujhse puchh contact kar puchh sakte hain.
Apko yeh post kaisi lagi yeh bhi jarur btaiyega.
Email: thepradeeptyagi@gmail.com


बहुत ही उपयोगी जानकारी दी है आपने। पर मैं लाख कोशिश करने के बाद भी HTML को समझ नहीं पाता हूं। यह तो मुझे देखने से ही बहुत टफ लगता है।
ReplyDeletehmmm thoda tough toh hai par ekbar familiar ho jaao toh sab samajh aa jata hai
DeleteKafi deeply samjhaya hai apne. :) Very nice
ReplyDeleteha bhai Ese navigation set karna bahut kathin hota hai.. thanks
ReplyDeletejyada kathin nahi hai bhai... bas thoda coding ko theek se dekhna padta hai.
Deleteकाफी अच्छा आर्टिकल है। आपने बड़ी आसानी से page navigation set करने के बारे में समझाया है।
ReplyDeleteVery good article for bloggers.....kai baten new sekhne ko mili....thanks.....
ReplyDeleteI don’t know how should I give you thanks! I am totally stunned by your article. You saved my time. Thanks a million for sharing this article.
ReplyDeleteWhat you're saying is completely true. I know that everybody must say the same thing, but I just think that you put it in a way that everyone can understand. I'm sure you'll reach so many people with what you've got to say.
ReplyDeleteHey keep posting such good and meaningful articles.
ReplyDeleteNice! informative post.
ReplyDeleteSir meri ek blog he wordpress par https://desitechblog.in/ . Ise me blogger par lena chahta hun wordpress se. Mujhe kya karna hoga.
ReplyDelete